


Here, we’ll guide you on how to optimize your Windows, Drivers, and in-game settings so that you can get maximum FPS in Apex Legends.
Respawn keeps adding new features to the game to keep the players engaged and entertained. However, these changes do not come free of charge. Every time Respawn updates the game, there is a degradation in performance because of the addition of new resources.
The game size was under 25 GB when it launched, but it is almost 69 GB now in Season 21 . It proves how much resource Respawn constantly puts into the game with every update, which eventually takes a heavy toll on the game’s FPS and performance.
However, by fine-tuning some Windows settings, editing config files, and tweaking some in-game settings, you can actually drastically improve your FPS and take your Apex Legends skills to the next level.
Read More: Apex Legends Rank Distribution
This FPS and performance tuning guide was last updated in Season 21. Additionally, we’ll update this article with up-to-date information as soon as new content drops or a new season launches.
Ways you Can Boost FPS in Apex Legends
In this guide, we’ll show you how you can tune your Windows and in-game settings and edit some game files so that you can get the smoothest experience in Apex Legends on low, medium, and high-end PCs. The guide will not only increase your FPS but also improve the game’s visual clarity and performance.
Windows Tweaking
First, we’ll show you step-by-step how you can tweak your Windows for better output in Apex Legends.
1. Enable Ultimate Performance Mode
Windows 10 and 11 OS limit your system to running in a balanced state to save power and keep your computer from overusing resources. However, if you want to play video games such as Apex Legends on your PC, you should turn Ultimate Performance mode on to get the maximum performance out of your system and get more FPS in Apex Legends.
By default, you can only allow your system only up to High-Performance mode. To enable Ultimate Performance mode, you need to unlock it manually.
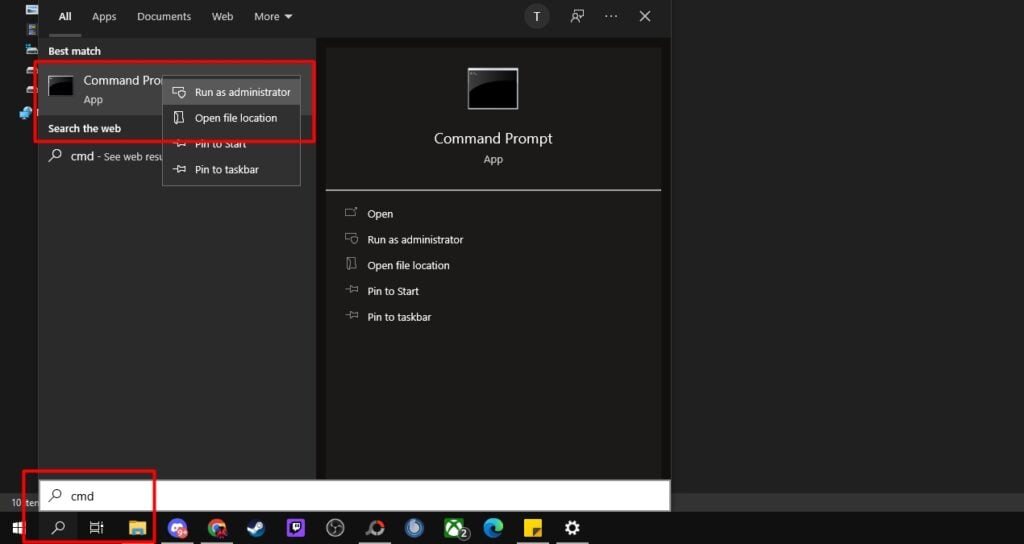
To enable and activate Ultimate Performance mode:
1. Type CMD in the Search option > Run Command Prompt (CMD) as an administrator mode.
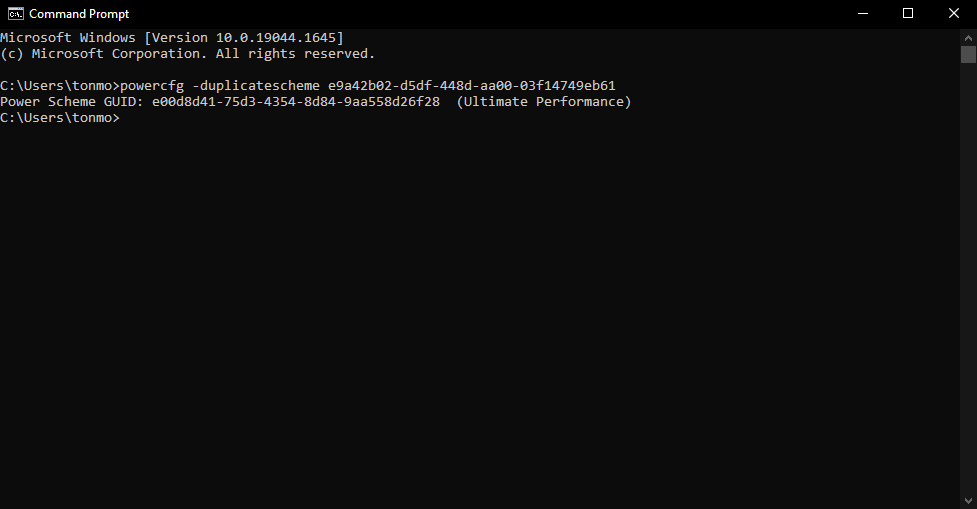
2. Copy the command below, paste it into CMD, and press enter:
powercfg -duplicatescheme e9a42b02-d5df-448d-aa00-03f14749eb61
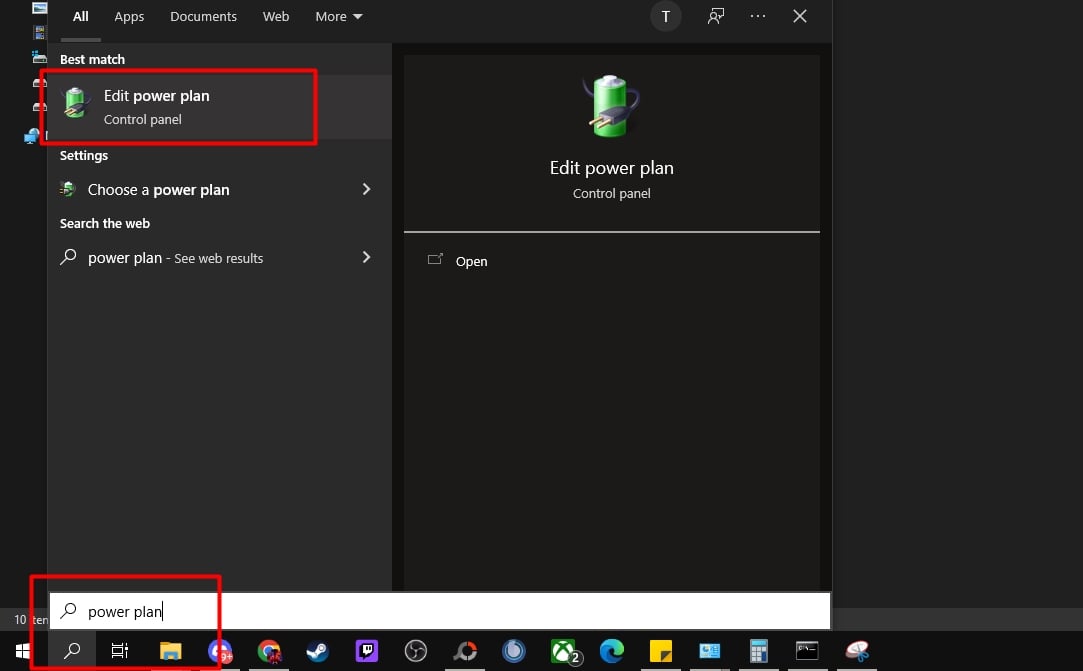
3. Type Power Plan in the search option > click Edit Power Plan
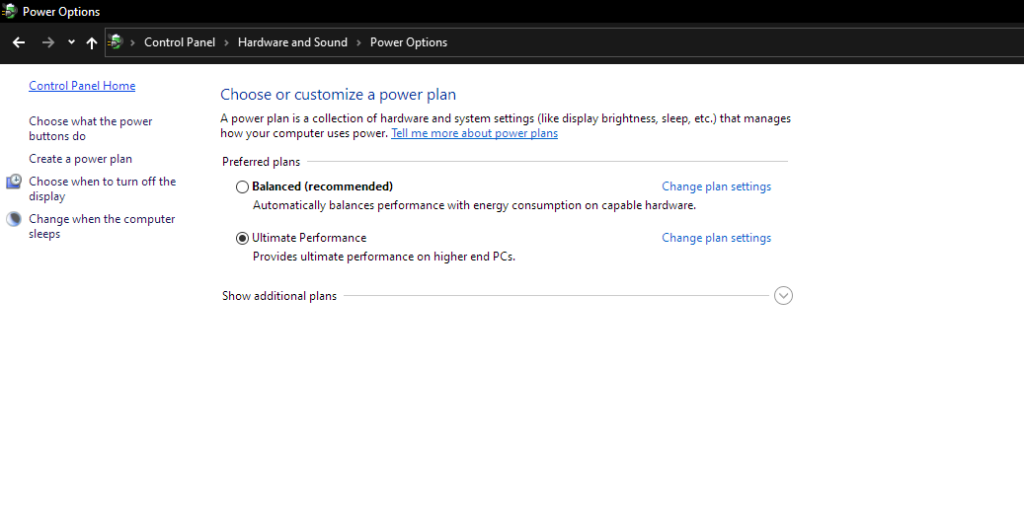
4. Click Power Options

5. Check the Ultimate Performance option
2. Disabling Visual Effects (For Low and Medium End PCS)
By default, Windows 10 and 11 have some features and options that increase visual clarity and are optimal for regular everyday use. However, these features can cost a little bit of your PC’s performance. So, you can actually disable these visual effects to increase your gaming performance. As it only increases Apex Legends FPS by a small margin, it is recommended not to disable these features on higher-end PCs.
To disable Visual Effects on Windows 10 and 11:
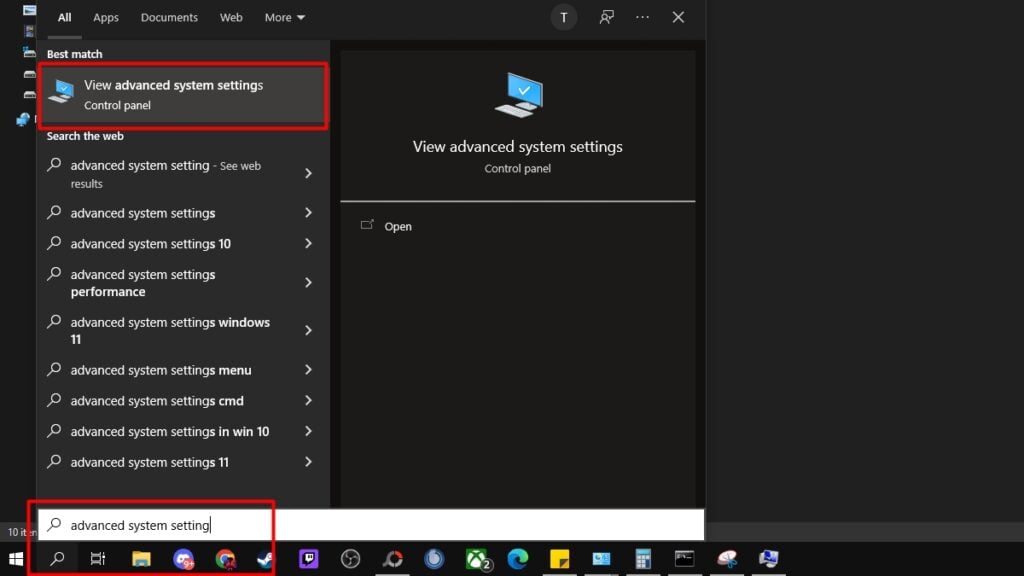
1. Type Advanced System Settings in the search option and click on View Advanced System settings
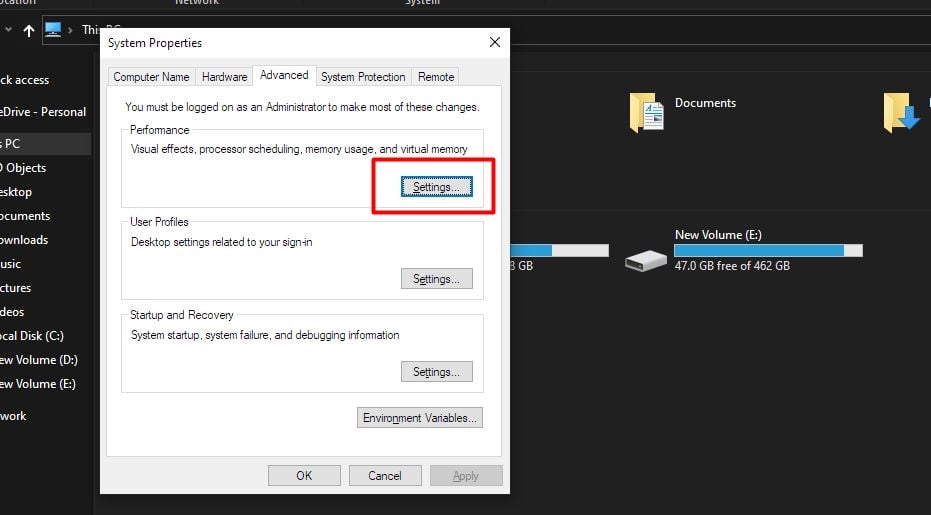
2. Click Settings
3. Click Adjust for best performance> press OK

3. Disable Unnecessary Startup Applications
When you boot your PC, a lot of applications automatically start with Windows 10 and 11. Most of these applications are there that you don’t even use. So disabling those applications will save resources on your PC and boost Apex Legends’ FPS.
To disable Startup Applications:
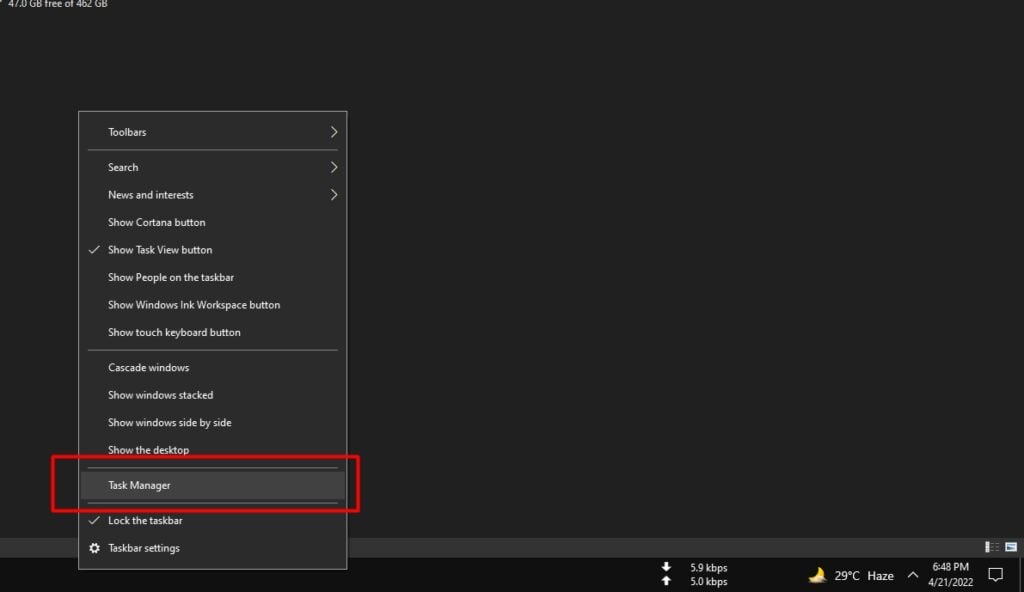
1. Right-click on your Windows Taskbar and select Task Manager
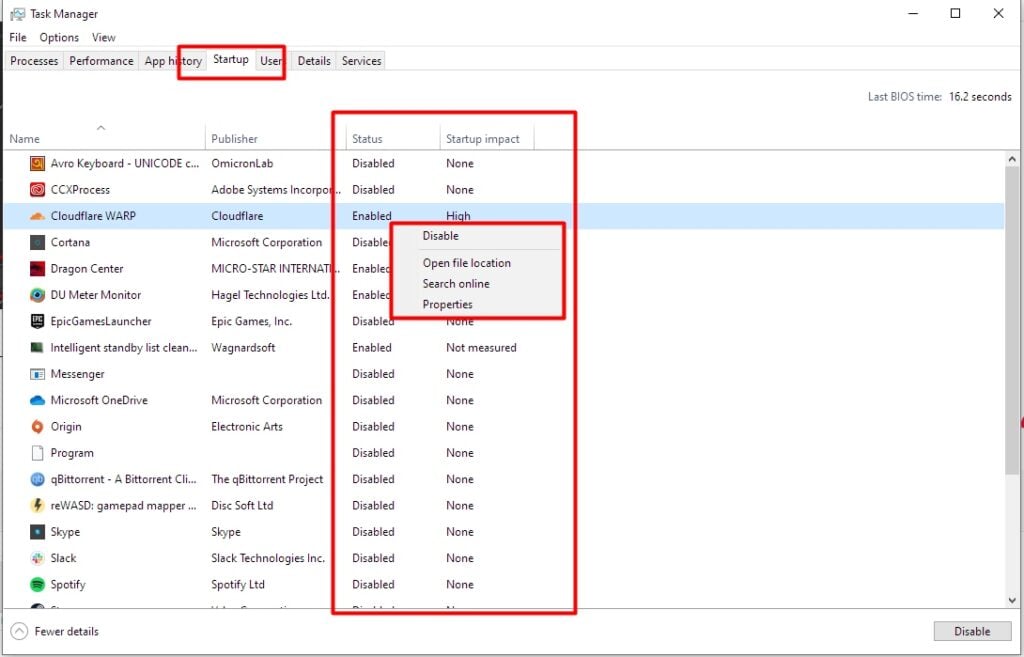
2. Go to the Startup tab. Here, you will see many applications with an Enabled/ Disabled status. You need to find the applications with Enabled statuses. After that, right-click on the applications that you don’t want to start automatically whenever you start your PC and click Disable. It will disable those applications from starting with Windows.
However, you can still manually turn on these applications whenever you want to use them.
4. Set Apex Legends Graphics Performance Preference to High
Windows 10 and 11 have a built-in feature for gamers so that they can get optimal performance while in a game. When turned on, Windows will allocate the maximum resources to Apex Legends. As a result, you can smoothly play the game even if there are background processes running.
To set Graphics Performance Preference for Apex Legends:
1. Type Graphics Settings into the search option and click on it

2. After the Graphics settings window pop up. Select Browse> find the location where you installed Apex Legends (For example: D:\SteamLibrary\steamapps\common\Apex Legends)> find r5apex.exe and select it> click Add

3. After you add r5apex.exe, Apex Legends will pop up under the Graphics performance preference section. Click on Apex Legends > Options. A new dialogue box named Graphics Preference will pop up. Select the High performance option and press Save.

5. Turn On Game Mode
Game Mode works similarly to High-Performance mode. This mode will allow Windows to allocate your computer’s resources properly so that you don’t have to face lags and stuttering while playing games.
To turn Game Mode on:
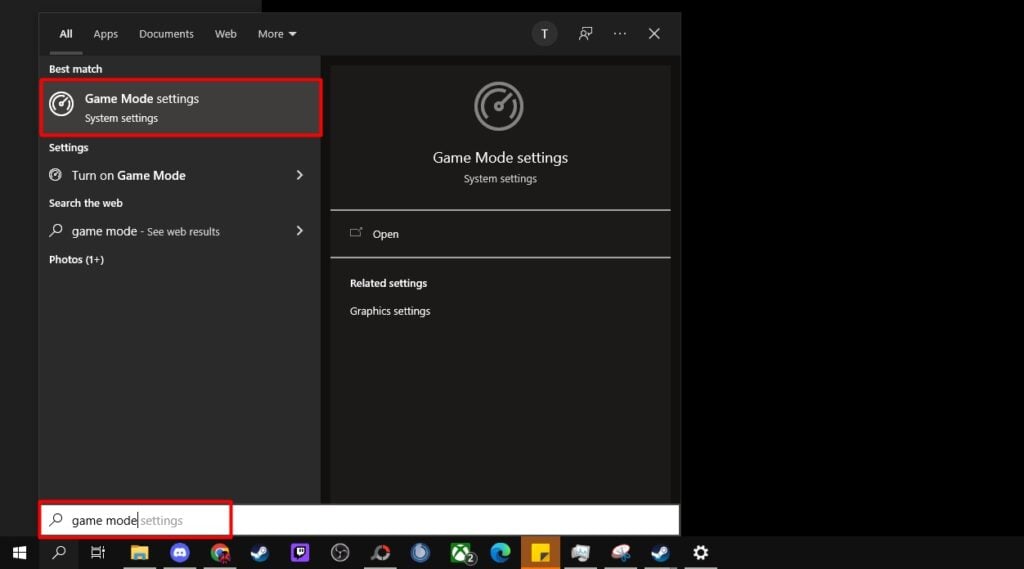
1. Type game mode in the Windows search option and click on Game Mode settings
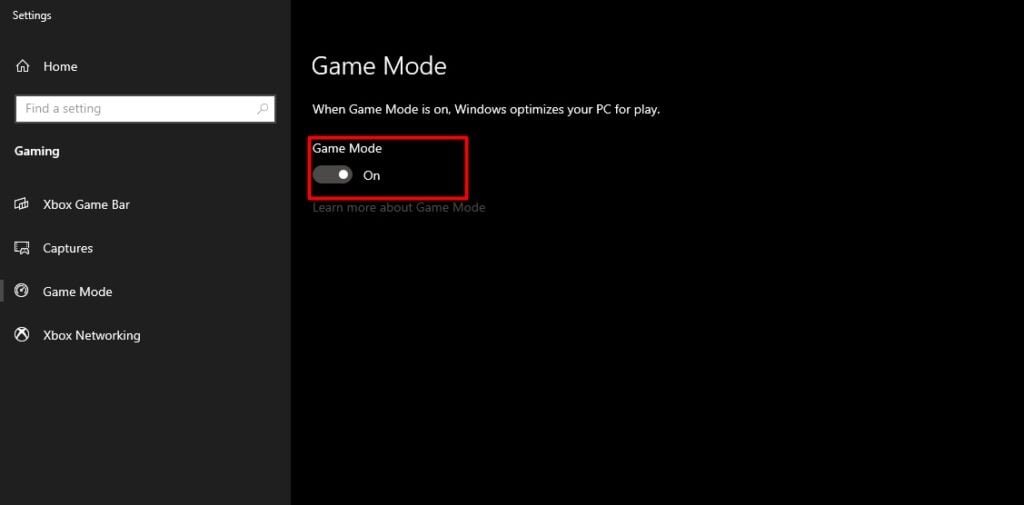
2. After the Game Mode window opens up, Press the Game Mode option to On.
6. Delete Temp Files
Windows saves temporary files so that they function properly. But after a certain period of time, it does not require the temporary files to work properly; then, they become junk files and can occupy a lot of your disk space, and can slow down your PC. So, it is recommended that you delete the Temp files every now and then to keep your PC nice and clean.
To remove Temp files from Windows 10 and 11:
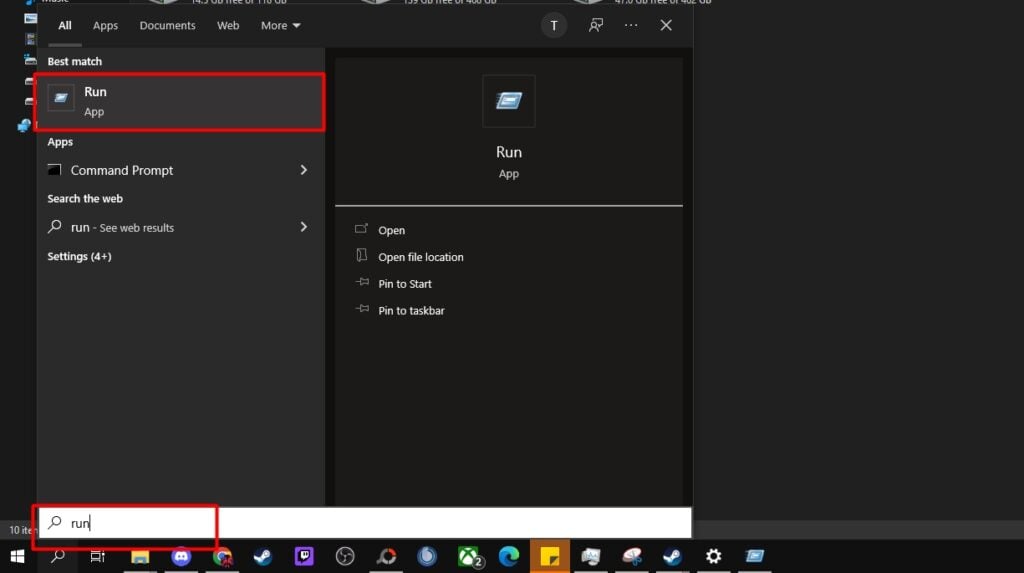
1. Type Run in the Windows search option and click on it.
2. A dialogue box will pop up. Type %temp% in the dialogue box and press enter.

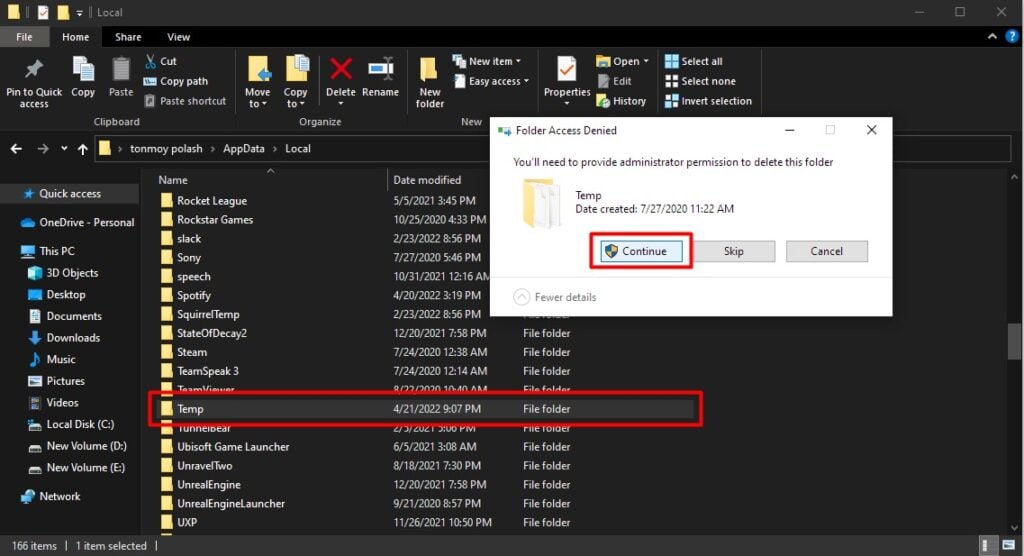
3. After that, the Temp folder will open up. Press backspace on your keyboard or go one page back by clicking the Local folder from the top.
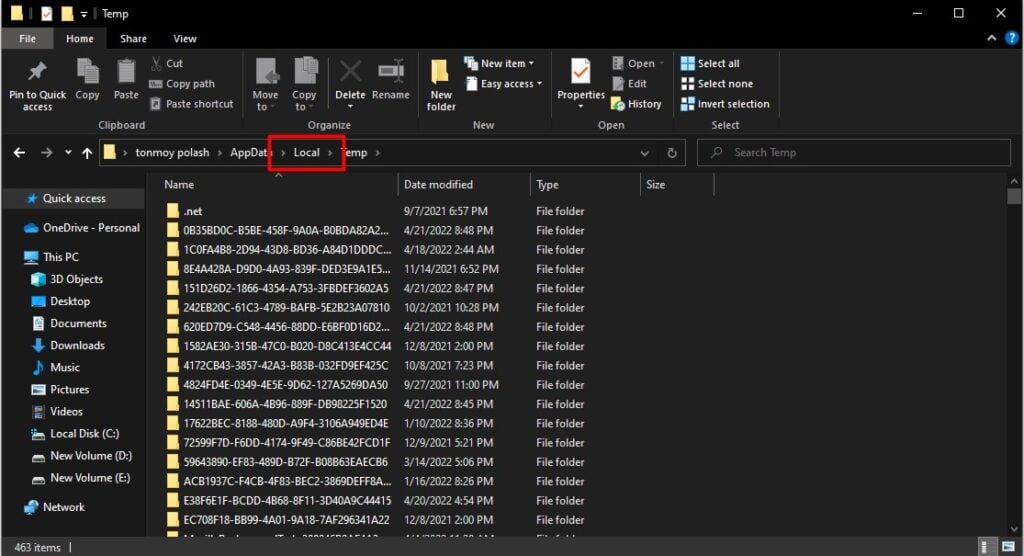
4. After that, select Temp folder> right-click > delete. After that, a confirmation dialogue box will pop up. Press continue. It will delete your temp files from your PC.
Read More: Best Loba Skins in Apex Legends: All Skins Ranked from Worst to Best
Third-Party Applications
Even though Windows 10 and 11 have great built-in features and options to optimize your PC for better Apex Legends performance, they have their limitations. So, these third-party applications can help you to fine-tune your PC’s performance to the next level.
1. Intelligent Standby List Cleaner (For Low and Medium End PCS)
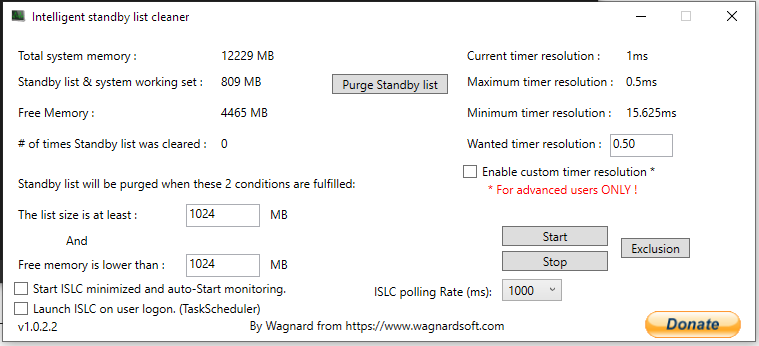
Intelligent Standby List Cleaner, or ISLC, is a great tool to free up your RAM. When you are using browsers like Google Chrome or doing any other work on your computer, RAM temporarily stores that information inside its memories. As a result, a huge chunk of your RAM stays occupied, and it may result in lag and stutter in Apex Legends, especially if you have a low or medium-end PC with 4, 8, or 12 GB of RAM. So, having ISLC running in your background will help you clean up your RAM without any issues, and it is completely safe to use.
To free up your RAM:
1. Download ISLC from here and Install it.
2. Open the ISLC application from your desktop or installation folder.
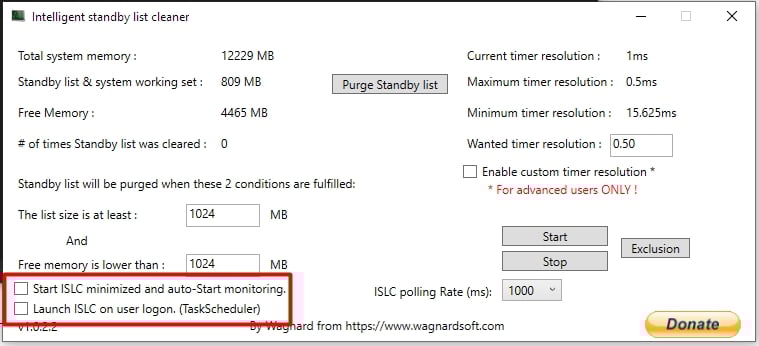
3. After the application opens up, first check the two boxes on the bottom left corner so the application starts every time you boot your windows.
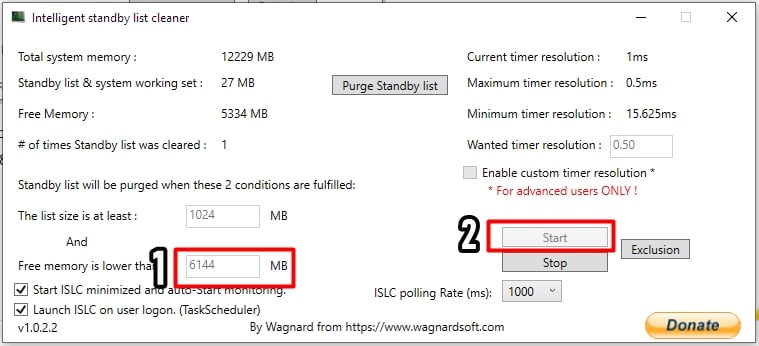
4. Now, fill up the “Free memory is lower than:” box with half the amount of your RAM size. For example, if you have 4 GB RAM, fill 2048 MB. For 8 GB RAM, fill 4096. I have 12 GB of RAM, so I have put 6144 in the box. After that, press start, and you are done.
Change Apex Legends Video Settings
No matter what you do, you need to optimize your in-game video settings properly to get the best performance out of Apex Legends.
Below, we will show you the best video settings for Apex Legends on Low, Medium, and High-End PCs. However, even with low graphics, Apex Legends does not degrade much visual clarity. So, whether you have a high- or medium-end PC, you can still use the same video settings as low-end PCs.
Best Video settings for Apex Legends
Video Settings
- Display Mode: Full Screen
- Aspect Ratio: 16:9 (native)
- Resolution: 1920×1080 (native)
- Brightness: 50%
- Field of View: 110*
*Field of View is a personal preference. It does not decrease your FPS that much. However, it is recommended that low-end PCs do not exceed 90 FOV. You can play with your FOV however you see fit for Medium and High-End PCs.
- FOV Ability Scaling: Disabled
- Sprint View Shake: Minimal
Advanced Settings
- V-Sync: Disabled
- Nvidia Reflex: Enabled + Boost
- Adaptive Resolution FPS Target: 0
- Adaptive Supersampling: Disabled
- Anti-aliasing: None*
*For low-end PCs, it is recommended to keep the anti-aliasing to none; for high- and medium-end PCs, the anti-aliasing feature in the Nvidia Control Panel alone is sufficient to increase visual clarity in Apex Legends.
- Texture Streaming Budget: Very Low (2GB VRAM)*
*Even with an Insane 8GB VRAM Texture Streaming Budget, it does not increase visual clarity in-game by a good margin. You will not find the difference between 2GB and 8GB VRAM. So, for medium- and high-end PCs, it is recommended that the VRAM budget be kept to 2GB. For Low-end PCs, it is recommended to keep the Texture Streaming Budget to None, as it will significantly make your game smoother.
- Texture Filtering: Bilinear
- Ambient Occlusion Quality: Disabled
- Sun Shadow Coverage: Low
- Sun Shadow Detail: Low
- Spot Shadow Detail: Disabled
- Volumetric Lightning: Disabled
- Dynamic Spot Shadows: Disabled
- Model Detail: Low*
*You can keep this Medium/ High for Medium to High-End PCs.
- Map Detail: Low
- Effects Detail: Low
- Impact Marks: Low
- Ragdolls: Low*
*You can keep this Medium for Medium to High-End PCs.
Comparison Between the changed video settings vs. Maximum video settings
Below are two screenshots for your comparison—the first one with the changed Video Settings and the second one with the Maximum Video Settings. You will not be able to find much difference. In fact, the game with optimized video settings looks sharper, which will help you spot enemies from far distance clearly and boost your FPS and performance.
Apex Legends with Optimized Video Settings

Apex Legends with Maximum Video Settings

Read More: Apex Legends Player Count
Modify Game Files
You can modify some files from the game folder and config folder to boost your Apex Legends’ FPS and make the game more responsive. Additionally, these modifications are entirely legal, and Apex Legends allows these modifications for better performance.
1. Disable Full-screen Optimization
Disabling full-screen optimization eliminates problems with performance overlay not working and improves input lag. So, for exclusive fullscreen, turning the fullscreen optimizations off for Apex Legends can improve your PC’s gaming performance.
To disable full-screen optimization of Apex Legends
1. Go to your Apex Legends game directory. (For example D:\SteamLibrary\steamapps\common\Apex Legends)

2. Right-click on r5apex.exe and go to properties.

3. Go to Compatibility > Check Disable fullscreen optimizations> Change settings for all users> Check Disable fullscreen optimizations > Click OK

2. Change the Video config file of Apex Legends.
You cannot change some settings from the game, such as removing ragdoll physics and shadows from the game; these changes will drastically improve your Apex Legends performance.
To make these changes in the video config file
1. Locate the thevideoconfig.txt file from Saved users > Username > Saved games > Respawn > Apex > local folder (For example: C:\Users\tonmo\Saved Games\Respawn\Apex\local)

2. Right-click on the videoconfig.txt > Open with > Notepad

3. find “Setting.csm_enabled” and change the value to “0”

4. Click File > Save

5. Here comes the most important part. This is a video config file, so if you change your video settings in-game, it will override the “Setting.csm_enabled” value to “1” again. Because of that, after you save the file, you need to make the file read-only so that if you change video settings in-game, it will not override the video config file. However, you need to restart the game if you change any in-game video settings.
To make the file read-only: Right-click videoconfit.txt > Properties > Check Read only box> OK

Change Nvidia Control Panel/ AMD Radeon Settings
By tweaking Nvidia Control Panel or AMD Radeon settings, you can improve visual clarity, lower input latency, and increase the responsiveness of Apex Legends.
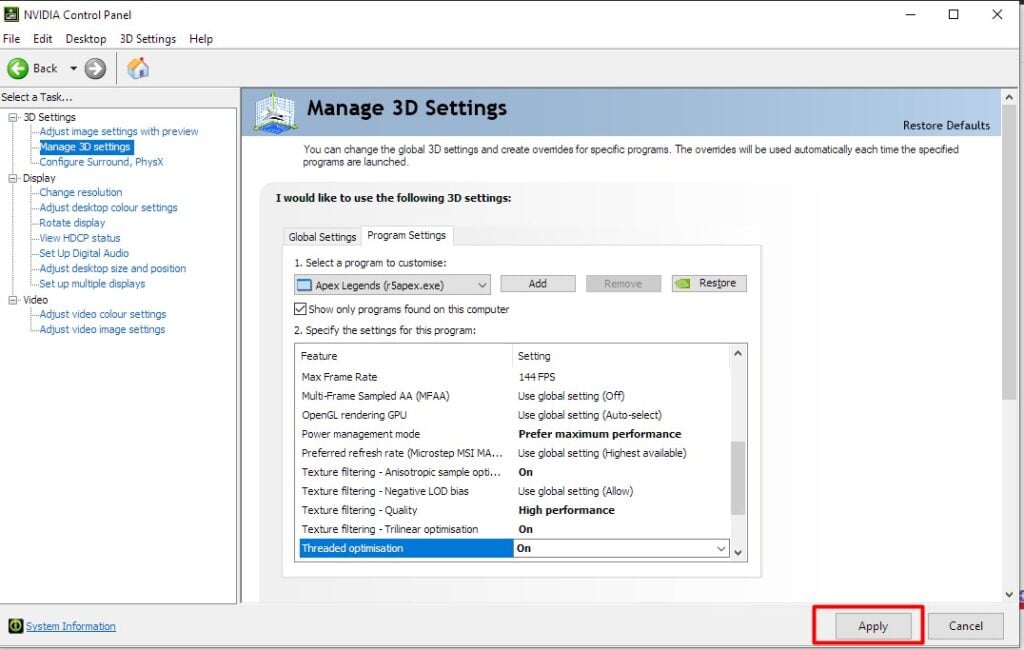
To change Nvidia Control Panel settings for Apex Legends
1. Right-click on your desktop and go to Nvidia Control Panel

2. After the Nvidia Control panel window opens. Go to Manage 3D settings> Program Settings> Find/ Locate Apex Legends from the “Select a program to customize.”

3. Change these mentioned settings:
- Anisotropic filtering: Application-controlled
- Antialiasing – FXAA: (For Low & Medium End PCs= Off, For High End PCs= On)
*Turning it On for High-End PCs will improve visual clarity in the game; however, it will cost a negligible FPS.
- Antialiasing – Gamma correction: Off
- Antialiasing – Mode: Off
- Antialiasing – Transparency: Off
- Background Application Max Frame Rate: Off
- CUDA – GPUs: All
- Low Latency Mode: Ultra
- Max Frame Rate: Off
- Monitor Technology: G-Sync
- Multi-Frame Sampled AA (MFAA): Off
- OpenGL rendering GPU: NVIDIA GeForce
- Power management mode: Prefer maximum Performance
- Preferred Refresh rate: Highest available
- Shader Cache: On
- Texture filtering – Anisotropic sample optimization: On
- Texture filtering – Negative LOD bias: Allow
- Texture filtering – Quality: High Performance
- Texture filtering – Trilinear optimization: On
- Threaded optimization: On
- Triple buffering: Off
- Vertical Sync: Off
- Virtual Reality pre-rendered frames: 1
4. Click Apply.
To change AMD Radeon settings for Apex Legends
1. Right-click on your desktop and go to AMD Radeon Settings

2. Go to Gaming> Select Apex Legends and change these settings
- Anti-aliasing Mode: Use application settings
- Anti-aliasing Method: Multisampling
- Morphological Filtering: Off
- Anisotropic Filtering Mode: Use Application settings
- Texture Filtering Quality: Performance
- Surface Format Optimization: On
- Wait for Vertical Refresh: Always off
- OpenGL Triple Buffering: Off
- Shader Cache: On
- Tessellation Mode: Override application settings
- Maximum Tessellation Level: Off
- AMD FreeSync: AMD optimized
- Frame Rate Target Control: Disabled
Read More: Best Valkyrie Skins in Apex Legends: All Skins Ranked from Worst to Best
Optimizing Steam for smooth performance
No matter what platform you use to play Apex Legends. Disabling in-game overlay and using commands in the launch option can boost Apex Legends’ performance.
To turn off the in-game overlay on Steam for Apex Legends
1. Open Steam Application > Go to Steam from the top left > Settings > In-Game> Uncheck Enable the Steam overlay while in-game > click OK

To use the launch option commands on Steam for Apex Legends
1. Open Steam Application > Go to Library > Right-Click on Apex Legends > Properties > General > Paste the commands under the Launch Options: -high -dev -no-browser +fps_max Unlimited

Final Verdict
If you follow the guide mentioned, you will surely see a drastic FPS improvement in your Apex Legends in Season 21. However, as Apex Legends is a very GPU and CPU-intensive game, there are limitations to how much this guide will help you.
So experiment with these tweaks one by one and see what helps you the most. Some of these settings might not give you an FPS boost. So, if you find anything unuseful, you can opt out of those settings, as it will just slightly impact your performance. However, it is recommended that you follow these steps completely to get the best result out of your PC while playing Apex Legends. Good luck, Legends!
Read More: Top 10 Meta Characters in Apex Legends